A versatile software that provides scalability, high performance and ease of use makes the measurement experience seamless for users.
Tested by the National Institute of Standards (NIST) and German Physikalisch-Technische Bundesanstalt (PTB), FARO® CAM2 2019 Software has been specifically designed to enable users of FARO 3D measurement hardware products to realize the highest level of performance across a variety of manufacturing industries including, but not limited to, automotive, aerospace, mechanical engineering, machine tools and metal fabrication.
Typical areas of applications include:
- Dimensional control,
- First article inspection,
- Part & assembly inspection,
- CAD-to-part comparison,
- Component alignment & assembly,
- Verification of tools, jigs and fixtures,
- Repeat part management, and
- Reverse engineering
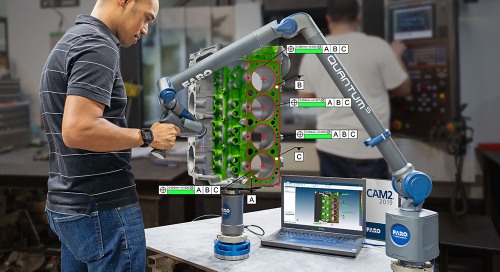
Regardless of the choice of FARO hardware, be it for tactile (probing) or non-contact applications (scanning), CAM2 ensures a complete and carefree integration with FARO metrology equipment. Moreover, users can easily connect several measurement devices to one running software instance. This provides the scalability that reduces inspection time by parallelizing the data capture process during any measurement job.
The new software has been developed to allow a seamless and easy measurement experience, without the need for extensive training or expertise, ensuring that any operators can quickly and easily accomplish their measurement tasks. This is possible thanks to features such as easy access to relevant commands, direct measurement and analysis of parts, an intuitive graphical user interface (GUI) for quick set-up management and oversight of inspection routines, image-guided, automated measurement workflows, live graphical feedback of measurement results, quicktools, and shortcuts that enable users to aggregate a complex measurement into single commands.
Enhanced Usability and Smart Guidance

In addition to the tight integration with FARO 3D measurement products, CAM2 2019 extends the narrative for high-value interactivity and usability.
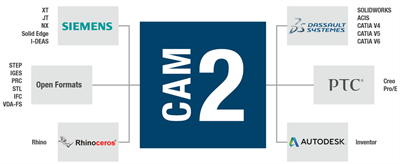
With Built-In Universal CAD Translators, all major CAD file formats can be directly imported into CAM2 at no additional cost. The software supports the import of different CAD formats from various vendors: 3D Systems (ACIS, CATIA V4, CATIA V5, CATIA V6 and Solidworks); Autodesk (Inventor and AutoCAD 3D); PTC (Creo); Siemens (I-deas, JT, NX, Parasolid and Solid Edge); Rhinoceros (Rhino3D). Open formats include IGES, PRC, STEP, STL and VDA-FS.
The ability to directly load the native CAD file also improves the fidelity of the resulting CAD that is used in CAM2, as it eliminates a common double translation to and from open CAD formats.
CAM2 2019 offers new features, which guide the user through specific operations visually and audibly. The idea is to lower the bar for the technical expertise required to use FARO 3D measurement solutions, shorten the workflows and allow operators to direct their primary focus on the measurement results themselves.
For example, CAM2 2019 provides users with scanning profiles to assist them in selecting the most suitable settings ensuring the correct level of data is captured. Now, when capturing a point cloud, the “Feature Properties” option provides the following scanning profiles:
Full: captures with the full resolution of the Laser Line Probe, the laser scanner attached to the FARO measurement arm.
Fine Detail: for small components which present fine details such as very small, detailed moldings.
Detail: for components where some details are present, such as small pressings with etched or stamped part identification numbers.
Curvature: for molded or pressed parts that have many small curved or radiused surfaces, such as plastic molded or pressed automotive components.
Smooth: for larger parts with flat or large curved surfaces, such as motorbike fuel tanks or car body panels.
To use a scanning profile, the user simply selects the required icon. It is also possible to create custom profiles by double clicking an existing profile and editing the settings.
Preset scanning profiles enable any user to choose the appropriate scan setting for the specific part type with a simple click of a button, thus streamlining the overall measurement experience.
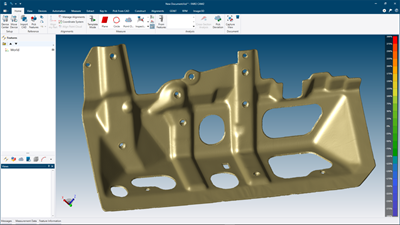
Moreover, with the “Live Deviation Color Scan” functionality, users can quickly check the quality of parts during the scanning process rather than as a post process. CAM2 provides real-time feedback with different colors showing deviations of scan data from CAD models as the operators are scanning, allowing live identification of potential issues.
An additional feature that facilitate users’ activities is the “Align-My-Part Wizard”, which simplifies CAD-to-Part alignment. With a single button click, the operator is guided through the process of defining an alignment using 3 features or 6 or more surface points.
New Meshing Algorithms

CAM2 also presents new meshing algorithms to provide aesthetic metrology-grade STL files that can be trusted when measuring to a golden part, while the “Export Mesh Wizard” has been simplified to aid users in choosing the correct meshing profile for their data. Once a point cloud has been created, the operator can simply export to mesh: as soon as the required point cloud has been selected a profile-selection Window assists the users to identify the correct meshing profile for their components. There are 3 different profiles available which are specific to component surface types. Once the required profile is selected, the operator can determine where to save the STL file and whether to import into CAM2, prior to the mesh creation.
Geometric Dimensioning and Tolerancing (GD&T), the system for defining and communicating engineering tolerances, has also been optimized. Simplified analysis and visual reporting allow the results from a part inspection to be displayed just like a print to easily interpret part quality. This overall perspective eliminates the need to look at each feature sequentially in order to make the same determination.
CAM2 Reporting capabilities allow operators to generate and share customized, comprehensive and easy-to-understand overviews of quality inspections, both inside and outside their organization at any point during the manufacturing processes, or after measurements have been completed. Based on specific needs, the graphically-rich reports can be customized in terms of format and information, while the use of colors intuitively highlights the status of inspected parts according to the defined tolerances.
Actionable Intelligence Through Statistical Process Control (SPC)
CAM2 has been designed to allow any user to step through even the more complex inspection routines. Repeat Part Management (RPM) provides an ecosystem where part programs from CAM2 2019 can be uploaded and run within the RPM Control Station, a fully-guided inspection software that can be executed by anyone, anywhere across a factory floor. That means that a specific inspection process can be designed once and then repeated and easily executed by anyone on the factory floor.
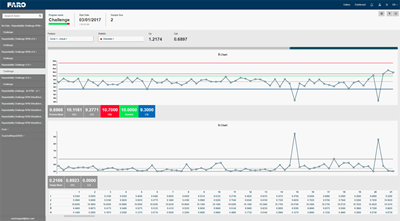
 The CAM2 2019 Software platform also supports an effective and smooth “interconnection” between metrology measurements (quality assurance) and production. It features the RPM Control Center, an integrated, web-based dashboard reporting tool that delivers real time inspection results and insightful trend analysis in a user-friendly set of adaptable visual reports.
This addresses the increasing needs for SPC (Statistical Process Control), delivering actionable manufacturing insights that go beyond simple component quality, with statistically based graphs and results for trend analysis and predictive alerts. These alerts not only highlight that the measurement target is trending beyond tolerances, but also provide advanced intelligence into the process and why a specific situation is occurring. This helps companies improve their processes and predictively anticipate when and why components may drift out of specification.
